CentOS服务器环境配置方法介绍
作者:admin发布时间:2021-11-06分类:软件教程浏览:评论:0
导读:1.配置nginx1.启动nginx服务。 命令如下:[root@VM_185_51/]#servicenginxrestart 2.测试nginx服务是否正常运行。 如果最后显示:`index.html'saved,说明nginx服务正常。[root@VM_185_51/]#wgethttp://127.0.0.1--2013-02-2017:07:26--http:/
1. 配备nginx
1. 运行nginx服务项目。 指令如下所示: [root@VM_185_51 /]# service nginx restart 2. 检测nginx服务项目是不是一切正常运作。 假如最终表明:`index.html' saved ,表明nginx服务项目一切正常。 [root@VM_185_51 /]# wget http://127.0.0.1 --2013-02-20 17:07:26-- http://127.0.0.1/ Connecting to 127.0.0.1:80... connected. HTTP request sent, awaiting response... 200 OK Length: 151 [text/html] Saving to: `index.html' 100%[==========================================================================================>] 151 --.-K/s in 0s 2013-02-20 17:07:26 (37.9 MB/s) - `index.html' saved [151/151] 3. 在网页中,根据CentOS云主机公网IP查询nginx服务项目是不是一切正常运作。 假如表明如下所示,表明nginx安裝配备取得成功。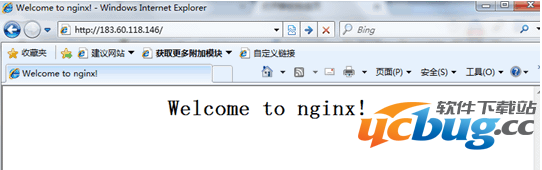
2. 配备PHP
1. 运行php-fpm。 [root@VM_185_51 /]# service php-fpm start 2. 改动php-fpm和nginx的配备,完成nginx和php连动。 (1)查看php-fpm默认设置配备。 [root@VM_185_51 /]# cat /etc/php-fpm.d/www.conf |grep -i 'listen =' listen = 127.0.0.1:9000 (2)php-fpm的默认设置配备的监视端口号为9000,如今仅用改动配备,将php分析的要求分享到127.0.0.0:9000解决就可以。 改动nginx配备,改动指令如下所示: [root@VM_185_51 /]# vim /etc/nginx/conf.d/default.conf 改动进行后具体配备如下所示,鲜红色文本为改动过的一部分: server { listen 80; root /usr/share/nginx/html; server_name localhost; #charset koi8-r; #access_log /var/log/nginx/log/host.access.log main; location / { index index.html index.htm; } #error_page 404 /404.html; # redirect server error pages to the static page /50x.html # error_page 500 502 503 504 /50x.html; location = /50x.html { root /usr/share/nginx/html; } # proxy the PHP scripts to Apache listening on 127.0.0.1:80 # #location ~ .php$ { # proxy_pass http://127.0.0.1; #} # pass the PHP scripts to FastCGI server listening on 127.0.0.1:9000 # location ~ .php$ { fastcgi_pass 127.0.0.1:9000; fastcgi_index index.php; fastcgi_param SCRIPT_FILENAME $document_root$fastcgi_script_name; include fastcgi_params; } # deny access to .htaccess files, if Apache's document root # concurs with nginx's one # #location ~ /.ht { # deny all; #} } 改动进行后,按“Esc”键,键入“:wq”,储存文档并回到。 根据下边的指令,查询配备是不是恰当: [root@VM_185_51 /]# cat /etc/nginx/conf.d/default.conf3. 配备起效
重新启动nginx,使配备起效。 指令如下所示: [root@VM_185_51 /]# service nginx restart Stopping nginx: [ OK ] Starting nginx: [ OK ]4. 自然环境配备认证
1. 在web文件目录下建立index.php。 指令如下所示: [root@VM_185_51 /]# vim /usr/share/nginx/html/index.php index.php文件的信息如下所示: <?php echo "<title>Test Page</title>"; echo "hello world"; ?> 2. 在网页中,根据CentOS云主机公网IP查询自然环境配备是不是取得成功。 假如网页页面能够表明“hello world”,表明配备取得成功。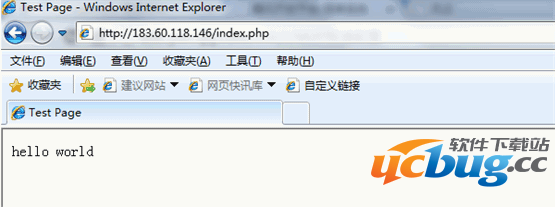
欢迎 你 发表评论:
- 软件教程排行
- 最近发表